Hey, do you remember me telling you about my funky new vintage measuring tape? I’m just loving it on my craft desk. It’s holding up all the lovely elements I’m using on this project. I just knew I needed it, ha!

Thanks for coming back to Boomdeeadda for part two of Artful Story Telling. On Wednesday I shared a short list of ideas that work for me when I’m planning a scrap page:
- Pick a theme (I choose hexagons) and repeat it.
- Starting with a paper that has a lot of colour gives you more flexibility
- Don’t limit yourself to one collection
- Don’t limit yourself to scrapbook product, an unexpected element (I used a map) can add interest
Normally, when you open a Scrapbook, you’re presented with two complementary pages. With that in mind, I’ve continued to work on a partner page, here’s a little preview.

Quite honestly, if you are a fan of the layered look in scrapbooking, the most impact you can make on a page, for the least amount of money, is by inking the edges of your elements. Sounds too simple right? It is absolutely that simple, yet your pages will be anything but. Check out my ‘Good-Better-Best’ demo and see what you think:
Making Leaves

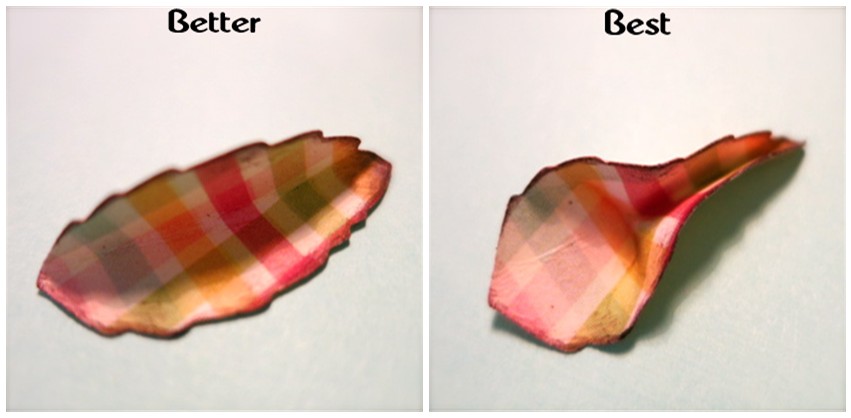
Can you see the difference between the ‘Good’ leaf and the ‘Best’ leaf above? It’s really just about creating a shadow with your ink and shaping it like a leaf. Shadows and shape will give your page depth and that will enhance your layers. You might have also noticed, my leaves are never just plain green. That would just be too humdrum for me. Once you tuck it under a pretty rose, viewers will absolutely know it’s a leaf.
See !!
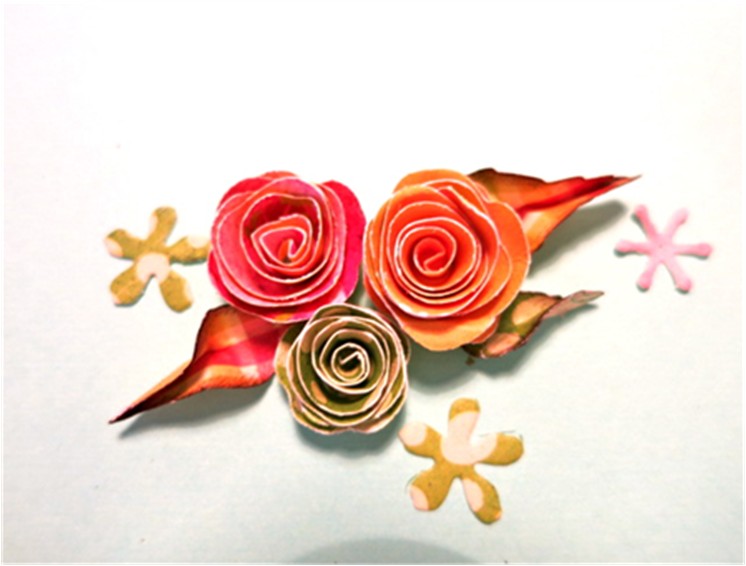
You can use the same technique with a lot of other elements on your page too, like butterflies.

I also inked the patterned paper framing my photo’s and every hexagon on the page. I would recommend sticking to one colour of ink for this throughout your project. I think it looks more cohesive but it’s entirely a personal preference.

Todays tips for artful story telling:
- Ink your elements to create shadows
- Shadows and shape will give your page depth and that will enhance your layers
- Remember to add shape to elements like leaves, butterflies or flying banners.
- Consider using one colour for shadowing throughout, it will look more cohesive
As the Queen Boomdee Bee, I wish you could all come spend the day with me and we could laugh and scrap something fabulous together. But since we can’t, maybe you’ll try one or two of these ideas on a project of your own artful story telling.

Who’s your favourite scrapbook subject?


Reblogged this on lovelyseasonscomeandgo and commented:
this is so pretty, I love your crafting ideas
LikeLike
Great project! You look very classy!
LikeLike
OMGosh thank you. 😀 So nice of you to say. I’ve never been told this ever. This photo was taken in Switzerland, I loved it there so much. I wore a lot of skirts there because in some churches you aren’t allowed slacks or jeans.
LikeLike
another gorgeous piece of work!:)
LikeLike
Thanks you Lea. The photo was taken in Switzerland, I met a super dog on this day at a wine and cheese party…he wasn’t hosting though HA. His name was Reeko.
LikeLike
if he was hosting that would be a whole new post in itself! lol
LikeLike
😀 LOL, I guess it would
LikeLike
This is wonderful art work. I have always wanted to do scapbooks, but just haven’t gotten around to do it. Reading this and the for-runner of a post has been very inspiring.
LikeLike
How awesome of you to say and thank you for visiting. I’m catching up over the weekend, sorry I missed your visit on part 1. I’m lucky to have the time and I can get lost in the craft room for hours. I was mentioning to someone else here, that many shops have work rooms with all the tools and for a small fee allow you to work on your projects there. That’s how I used to do a lot of the detailed shapes. I finally bought my own die cutter (about $75). It really elevates your projects. You’re able to get a lot of intricate shaped elements very simply. Tim Holt is really big in the industry. He has a fun website. Thank you so much for your message.
LikeLike
I just read part 1 right now – so don’t worry. And thanks for the additional information. 🙂
LikeLike
Just beautiful artwork! You are having way too much fun my friend…kudos to you.
LikeLike
Thank you Laurie, yes I am a woman of leisure most days. It’s a good gig 😀 Today I finally manage to do all my bedding…and regular laundry too…it’s not always glamorous, HA Have an awesome weekend and thanks for your message!
LikeLike
You’re so creative! Somehow I’ve never gotten into scrapbooking, but this post almost makes me want to give it a try.
LikeLike
If you haven’t been bitten by the bug, I would say ‘congratulations, you are probably saving lots of money’ LOL But thanks Sheryl, you’re really kind to say so. Not everyone wants to do it so detailed. I think it’s fun to mix and match all the paper. It’s like decorating on a mini scale.
LikeLike
I love, love, love this Boomdee! You’ve inspired me to give it a go (maybe a little gift tag first of all)… but don’t hold your breath as I have a rainy day list as long as my arm.
I’m now on the look out for a vintage ruler – it’s fabulous 🙂
LikeLike
Ha, I won’t hold you to it PJ 🙂 but thanks for your fun message. If I were in your shoes, I’d be romping around the english countryside, out in the garden or gads, eating left over Christmas fruit cake and a cup of tea.
I thought that ruler was pretty handy and then I pictured it holding some vintage family photo’s somewheres too. It’s like a little easel. Well that’s one little unusual purchase the worked out well…LOL
LikeLike
You are so talented. Really like you style:)
LikeLike
Hi, thank you so much for that and for coming by Boomdeeadda. Do you like to scrapbook or collage? I’ll come by and take a peek at what you’re up too. It’s one of the fun things about scrap work, everyone does it a little different and there’s lots of stuff to pick from at the shops, I’m in love with this Kaisercraft paper.
LikeLike
Hi, I have tried a little bit of scrapbooking but I’m not so good.But I think I will try again someday:) I have lots of stuff to use so it’s is just to get started.
Right now i’m working with decoupage, it’s really fun.
LikeLike
oh ya, loving that idea. I decoupaged a map onto the turn table you see in the first photo. Posted a while back, I think it’s called “I Love The Whole World” if you wanted to surf back. Hope you share your project sometime
LikeLike
I like these posts not because I have a prayer of ever being half this crafty, but because it’s nice to see what people with real talent can pull off!
LikeLike
Will, you are a brave man! LOL Thanks for your message today, especially since it is not your forte, that’s so nice of you. You my friend have no idea how talented you are! Nothing makes me laugh like Marking Our Territory. Your post topics and video’s are all so original and witty and Eko makes me laugh just by looking at the camera. You guys are stars I say….Stars (say that last part like Conan)!
LikeLike
I’ve been looking forward to this since you posted part one. You are an artist extraordinaire, my dear, truly a Queen-B(oomd)ee.
I’ve used inks and chalks and love the 3d effect, but you’ve really taken it to a new level, with the pinches and folds. I must remember to do this more often.
The tiny bees that appear throughout are delightful. Such a lovely detail. Great colors (so you), and lovely tutorial as well.
LikeLike
Thanks for Buzzzzing in to the Boomdee craft tutorial again 🙂 and what a nice thing to say. The folding thing is just so simple, I hope that came across. It takes 4 seconds to make a flat leaf more leafy, that’s a word right? 🙂
I cut the leaves out with a die cutter but I’ve also seen hand held punches for the same thing. I’ve never paid full price for any tool. I only shop if I have a coupon.
I loved the card you sent me so much, my next project is the tri-fold card. I found a great tutorial online and can’t wait to use the paper you gifted me, thanks again Alys. You are a girls dream friend. mwaaaa!
LikeLike
Right back atcha, Boomdee!
LikeLike
Awesome tutorial on how to make your craft project even better! Showing the difference between good and better does make a difference to a craft project. I know first hand on how beautiful your crafts are! You are truly the master of crafting! I bow to you…
LikeLike
Yes! Everything Nikitaland said.
LikeLike
O Alys (hand wave past face)….Stop. LOL ❤ <3. Can't wait to go to The Island with you….(hands clapping quickly with big smile on my face)….And then we can lunch like a couple of diva's in the sunshine! Mwaaaa
LikeLike
HA, I’ve though the same thing watching you over at Nikitaland, no bowing is necessary 😀
I really gravitate to the collage aspect of making paper projects but little things can make a simple page or card fun too.
By the way, why does Idol always save a tear jerker story for last this year? I had to finish this post with blurry bulging eye’s. Wasn’t the little blonde fellow cute? Next week should be another teary night when they start to send kids home..o boy, break out the Kleenex.
LikeLike
I’m forever thinking of scrapbooking some of my photos. Even bought stuff for it but never get round to it and am also sure I could never do justice like you have. You might just have inspired me to at least try. Quick question though. If you have 3d elements, don’t they get squashed when you close the pages?
LikeLike
Thank you for visiting and your message. If you are just beginning, you can certainly simplify things or start with 8.5 x 11 projects or even Gift Cards. They usually work up faster and take less product. There’s lots of ways to scrapbook. While I gravitate to Collages, this girl makes attractive pages with very little added elements, and they turn out beautiful too
http://debbiehodge.com/2011/07/ideas-for-quick-scrapbook-page-titles/
Thanks for asking about saving the pages, that’s a great question. I will enjoy them in my little gallery for a bit. Then save them in a 12×12 cover and store them in a 12×12 three ring binder. The binders have a 3″ spine and hold 8-10 pages done in this fashion.
Which ever way you choose to save your memories, it’s just fun to be creative. If you are apprehensive about starting, maybe take a class at a store where you like their sample pages, that’s a good way to kick start your own projects. Good Luck!
LikeLike
Long Life, I had the exact same thoughts and question! I have a ton of creative stuff that I’ve let age (like fine wine) hoping for the day I will have time to get to it all. I buy it all with the 50% coupons, as Boomdeeadda says, but unfortunately I don’t get much done – but love to play around with it when I need to forget my troubles. I do wonder about squashing the pages. Thanks for the tips and the links, Boomdeeadda. How do you display the pages in your gallery? Do you store your finished books lying flat, or vertically? I’ve heard they need to lie flat, but seems like they’d still get squashed if they were stacked. You can tell I’m not very informed about scrapping, but your site would make anybody want to try it! Truly dazzling!
LikeLike
Hi Julia, you ladies have given me an idea, I should do a post about enjoying your artwork. Thank you for asking. Since we are only here temporarily, I’ve created a little gallery on top of my Scrapbook closets. I’ve purchased large plate stands at the Dollar store. They’re clear plastic and will stand a sturdy page very easily. The binders I’ve brought here (I have more in storage) are all tucked in a whicker basket, spine up (so the pages hang inside). I look thru them for inspiration when I feel stuck or just to enjoy the photos. Since techniques are always changing, it’s fun to look back. Thank you again for your nice complement.
LikeLike
I love the way the leaves and flowers become 3-dimensional and I adore those butterflies!
LikeLike
Thank you Clowie! and so easy to go from flat to fab! If your mom is a scrapbooker, you could give her a little nudge to remind her to take a break, sometimes I get carried away. I’d love to take you out for a walk today here. It’s snowing now but going to be +3 C this afternoon. The perfect day, fresh snow and sunshine. Have a fun weekend!
LikeLike
Beautiful ideas.
LikeLike
Thanks for your message and visiting. It’s really gotten me through a cold week of weather. I guess if I didn’t do this, there’d be a million other things too. I find so many good ideas at WordPress. It’s fun to mingle with so many creative people in one place. Have a great weekend!
LikeLike